
Yes it can be done, and no It’s not to advanced (maybe a bit…)
#IRL #nimblestreamer #WMSPanel #raspberry #RPI #linux #gopro #diy #4G #5G #twitch #youtube #streaming #irlbackpack #SRT
Q1: Is it free?
A:1 Yea…No. Not entirely… But it can be done free. Yes I know, confusing.
A:1 The equipment will cost you, but it’s a cheap and versatile setup.
Q2: Will this setup take a long time to finish?
A2: No. You can get it done in an evening. Depends on your knowledge.
Q3: Will this require skills to finish?
A3: Basic reading and writing skills. You can copy and pase a whole lot.
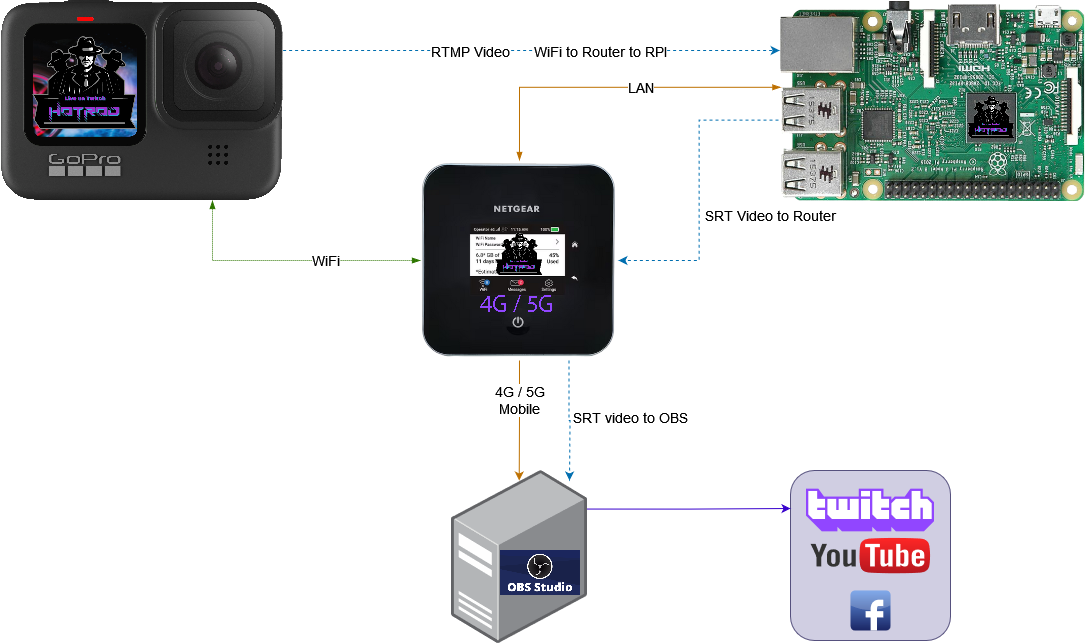
Q4: Can you show me how this works. Like, how it flows?
A4: Yes…
Level 1. We start with the RPI
RPI is short for Raspberry PI, and it’s a cheap single board computer.
In this guide, we will utilize the RPI 3B+ and all of its tiny power…
For this Level you will need:
- A USB boot preparedRaspberry PI 3B+ or better (better requires more power). The more powerful it is, the more power it draws = Bad for your battery bank.
- A good powersupply (2,5A or better, at least 5A for RPI4), later a large powerbank
- A good USB stick, USB3 is recommended for speed.
- Raspberry PI OS (legacy), Buster, Debian 10, 32-bit with Desktop (we will boot without this later on, headless).
- Another PC…, monitor, keyboard, mouse, network cable and a 4G/5G mobile router, preferrably a rechargeable router (USB power), this is not required for the setup, but it is essential for this IRL stream setup.
Level 2. Here we go… Getting ready
- On the PC (windows?): Download the Raspberry PI OS from the link above. No need to unzip/extract the file. Use as is.
- Download and install BalenaEtcher – This we will use to populate the USB stick.
- Insert your USB stick and start BalenaEtcher, select the downloaded file and select your USB device.
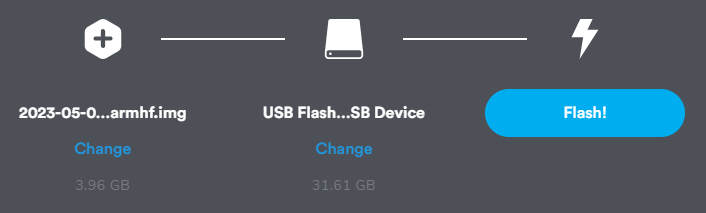
- Click Flash! Wait for the image to install on your USB device. Have a coffe while you wait…
- Connect your RPI to a monitor, keyboard, mouse and plug in the bootable USB device – Power Up.
- You should get a colorful splash screen shortly after powering up.

- Now for the setup of the RPI to our liking.
- We will Set a Password.
- We will Change Username.
- We will set up time zone, language and keyboard layout.
- We will give RPI a sweet name.
- We will change the boot to start directly in CLI (console).
- We will enable “root” user.
- We will activate SSH and enable root login, we will however use another account for most stuff…
Level 3. Starting configuring the PI
- Set location. Country, Language and Timezone – Me I use Country: Norway, Language: Bokmål, Timezone: Oslo and I check for “Use English Language”.
- Set a password for user “pi” – Please use a strong password, Capital and lower case letters, numbers and special characters.
- Tick the box if you got a black border on your screen. I did.
- Now searching for WiFi network, skip this step – You want to use cabled network to your router.
- Update Software. I would do this, and I did… Took a minute or so, but this can take a while on some versions.
- Do a restart…
Next step…
- Navigate to the Raspberry menu…
- Go to Preferences – Raspberry Pi Configuration
- System: Change hostname to your liking – No spaces, only lower case – This is the “name” of the Pi on the network.
- Boot: To CLI
- Auto login: Disabled
- Interfaces: Enable SSH
- Localisation: Keyboard – Select the right one.. For me in Norway i select “Generic 105-key PC (intl.)”, Layout: “Norwegian” and Variant: “Norwegian”
- If you changed “hostname”, the RPI will reboot when you apply the settings.
Open Terminal
- Activate “root” (administrator):
sudo passwd– Give the account a strong password. - Test the root accout by typing
su– Type the password you just gave the account. The line should now start with “root@…” – Typeexitto log out from the root account. - Login at the CLI with username:
piand thepasswordyou set in the beginning. - Reboot the Pi – type:
reboot - Login as root: username “root” and your new password.
- Change the default username “pi” to something that make sense:
Type:usermod -l yournewusername pi
Example:usermod -l onlyme pi
In the example you find that “pi” is the existing username and the new username will be “onlyme” - We will have to rename the old “home” folder for the new username – type this:
usermod -m -d /home/newuser newuser
Example:usermod -m -d /home/onlyme onlyme - Log out and log in as your new “Pi” user: exit
- Type in your new username and password
Still in terminal – SSH remote terminal
- We want some root access in SSH terminal.
- We need to change a line in a config file.
- Type:
sudo nano /etc/ssh/sshd_config - Type your password.
- Use arrow keys to navigate to a line that reads: #PermitRootLogin prohibit-password
- Remove the hashtag # and change it to read:
PermitRootLogin yes - Press CTRL+X
- Press Y
- Press ENTER
- Write:
sudo service ssh restart - You have now opened for root remote login and you have restarted the SSH server to reload the changes you have made.
You should be able to remotely connect by using your ordinary user (previously known as pi) and root user on the SSH server in your Pi with e.g. Putty from a Windows PC.
We are now done preparing the Raspberry Pi for Nimble Streamer!
We will now soldier on and install dependencies and the Nimble Streamer… You still with me? Great!
Now! Level 4.
- You will need to sign up for a WMSPanel account, or sign in to an existing account.
- You should be logged into your RPI terminal directly or with an SSH client onto your RPI, use your ordinary account, not root.
- To install Nimble Streamer you do as follows:
- Add nimble streamer repository:
sudo bash -c 'echo -e "deb http://nimblestreamer.com/raspbian/ stretch/">> /etc/apt/sources.list' - Download and install gpg.key:
wget -q -O - http://nimblestreamer.com/gpg.key | sudo apt-key add - - Update your repository:
sudo apt update - Install Nimble:
sudo apt install nimble - Install Nimble SRT package:
sudo apt install nimble-srt - Register the Nimble Server with your WMSPanel:
/usr/bin/nimble_regutil
– Fill in your wmspanel admin account email
– Fill in your wmspanel admin account password - Restart the Nimble server:
sudo service nimble restart
The server should now appear in the WMSPanel under Servers. Did it? No need to brag ;p You did well 🙂
Here are some useful terminal commands for your server
- Status: service nimble status
- Start: service nimble restart
- Stop: service nimble stop
If you get an error about unknown GPG key import Nimble Repository public key, use the following commands:
- Re-download and install gpg.key:
wget -q -O - http://nimblestreamer.com/gpg.key | sudo apt-key add -
If you give up and want to remove Nimble
- Stop server: service nimble stop
- Uninstall server: sudo apt purge nimble
– More in depth from the source? Go here
Alright! Level 5. Now, relax… Go from CLI to GUI
Abbreviations: CLI (Terminal) and GUI (Graphical User Interface)
Head on over to https://wmspanel.com
- Click Servers and select your RPI Nimble Server.
- Click Edit in the “Server Info” banner.
- Edit “Max RAM cache size(MB)” and set it to: 512 – Click Save
- Go back to Server Info and look trough the info to the left. Make sure it also has this line: “SRT package: Installed” – If it does not, go back to your CLI / Terminal and install the SRT pack again:
sudo apt install nimble-srt
– Restart the server again:service nimble restart
Go to Nimble Streamer – Live Streams
Global: It should look like this…
Go to Nimble Streamer – Live Streams
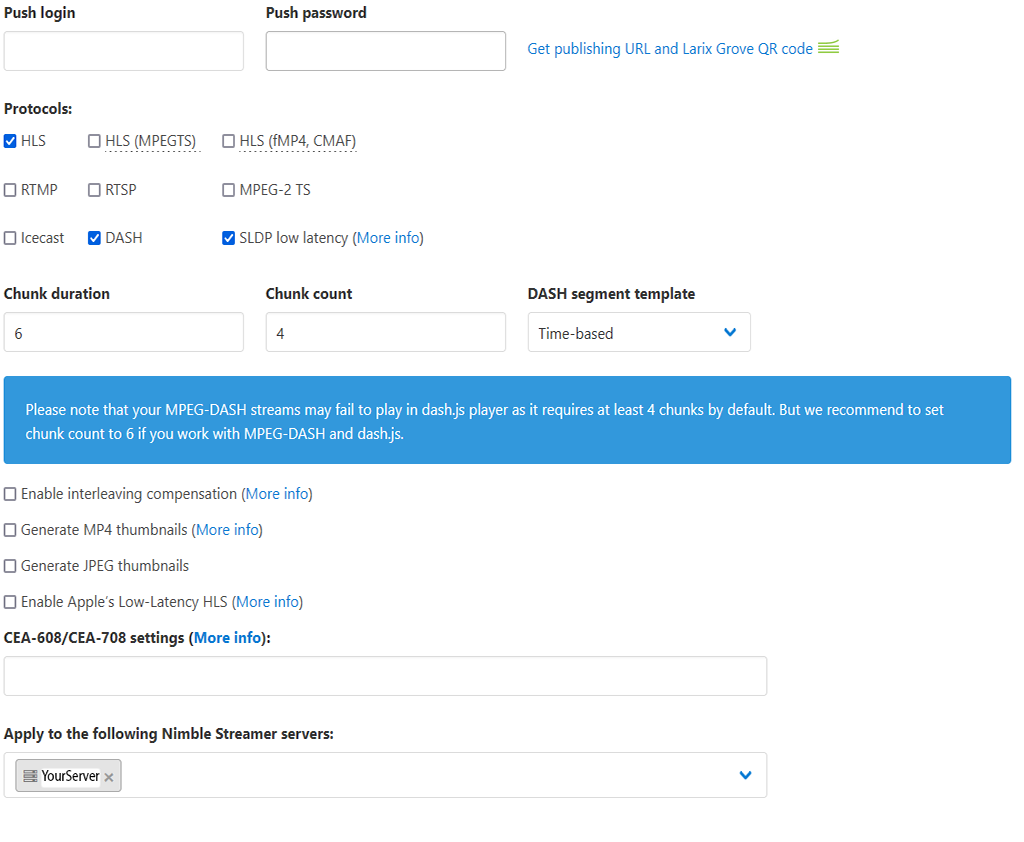
Applications – Click Add Application settings
Fill in as shown here:
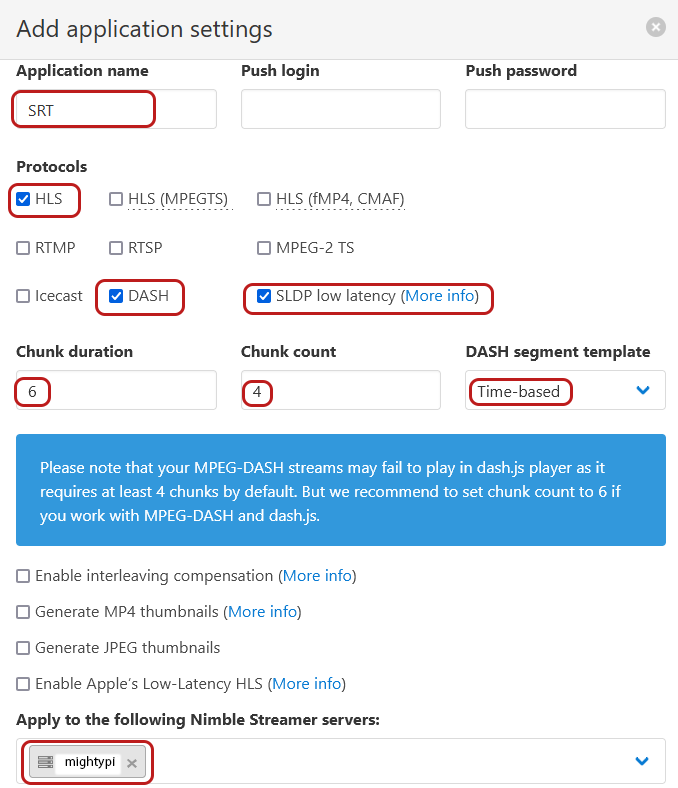
Note: The protocols HLS, DASH and SLDP can probably be unchecked to ease the load on the RPI. Not yet verified. Works fine with them on.
Go to Nimble Streamer – Live Streams
Interfaces – Click Add RTMP interface
Fill in as shown here:
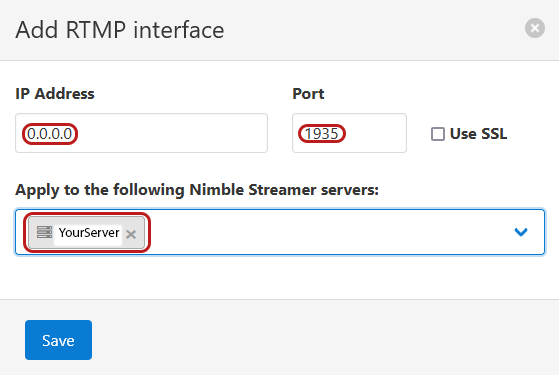
Yes… IP Address needs to be 0.0.0.0 and default port is 1935. This means that your RPI is listening on all networks on port 1935.
Move over to, Nimble Streamer – Live Streams
UDP streaming (UDP, SRT, RIST)
Fill in as shown here:
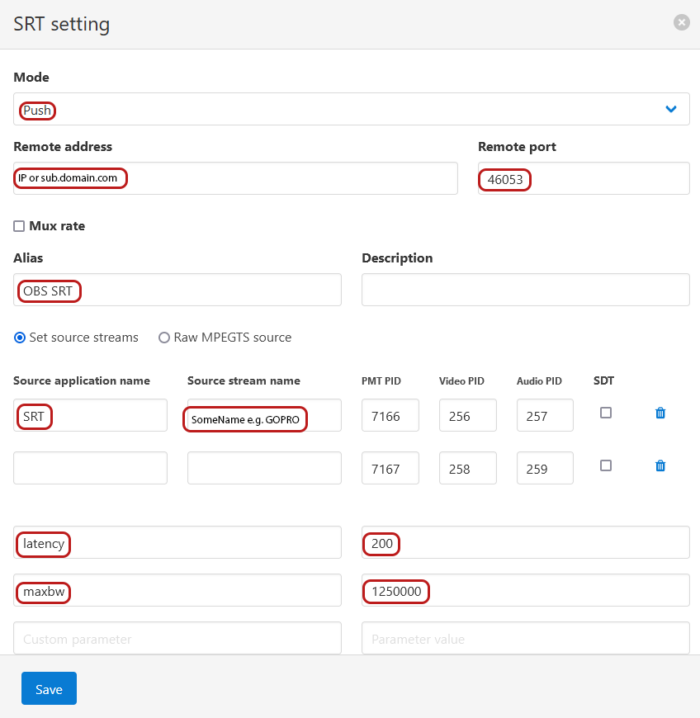
These settings has been tested with 1080p 50hz video resolution. maxbw (max bandwidth) needs to be high enough to accomodate the data stream from the camera/video source.
TechTip: For IRL streams it is OK to stream 720p 50hz to your RPI, it will require 50% less bandwith. 720p will give you a crisp and smooth video feed, whereas 1080p might mess up the picture where things move fast or you do e.g. fast panning.
You can add several SRT settings if you say, have several cameras.
You need to have one unique remote port for each SRT setting/camera feed.
Also remember to forward your ports through your router.
Level 6 – Last Step…? OBS SRT Server…
You gotta recieve the SRT videofeed to stream it to e.g. Twitch, YouTube, Kick, Facebook…
Ok. Start OBS Studio or your favorite streaming software, but this is for OBS since we just love it.
- Add Media Source, remove the check mark for Local File.
- Add Input:
srt://192.168.1.10:46053?mode=listener&tlpktdrop=1
Exchange the IP address to the IP address you have on the computer where OBS is running. - Add Input Format:
mpegts - Set Network Buffering to 1 MB or less.
- Set Reconnect Delay to 1 second.
Connecting the GoPro feed to the RPI
- Turn on the GoPro.
- On your mobile device, launch your GoPro Quik App.
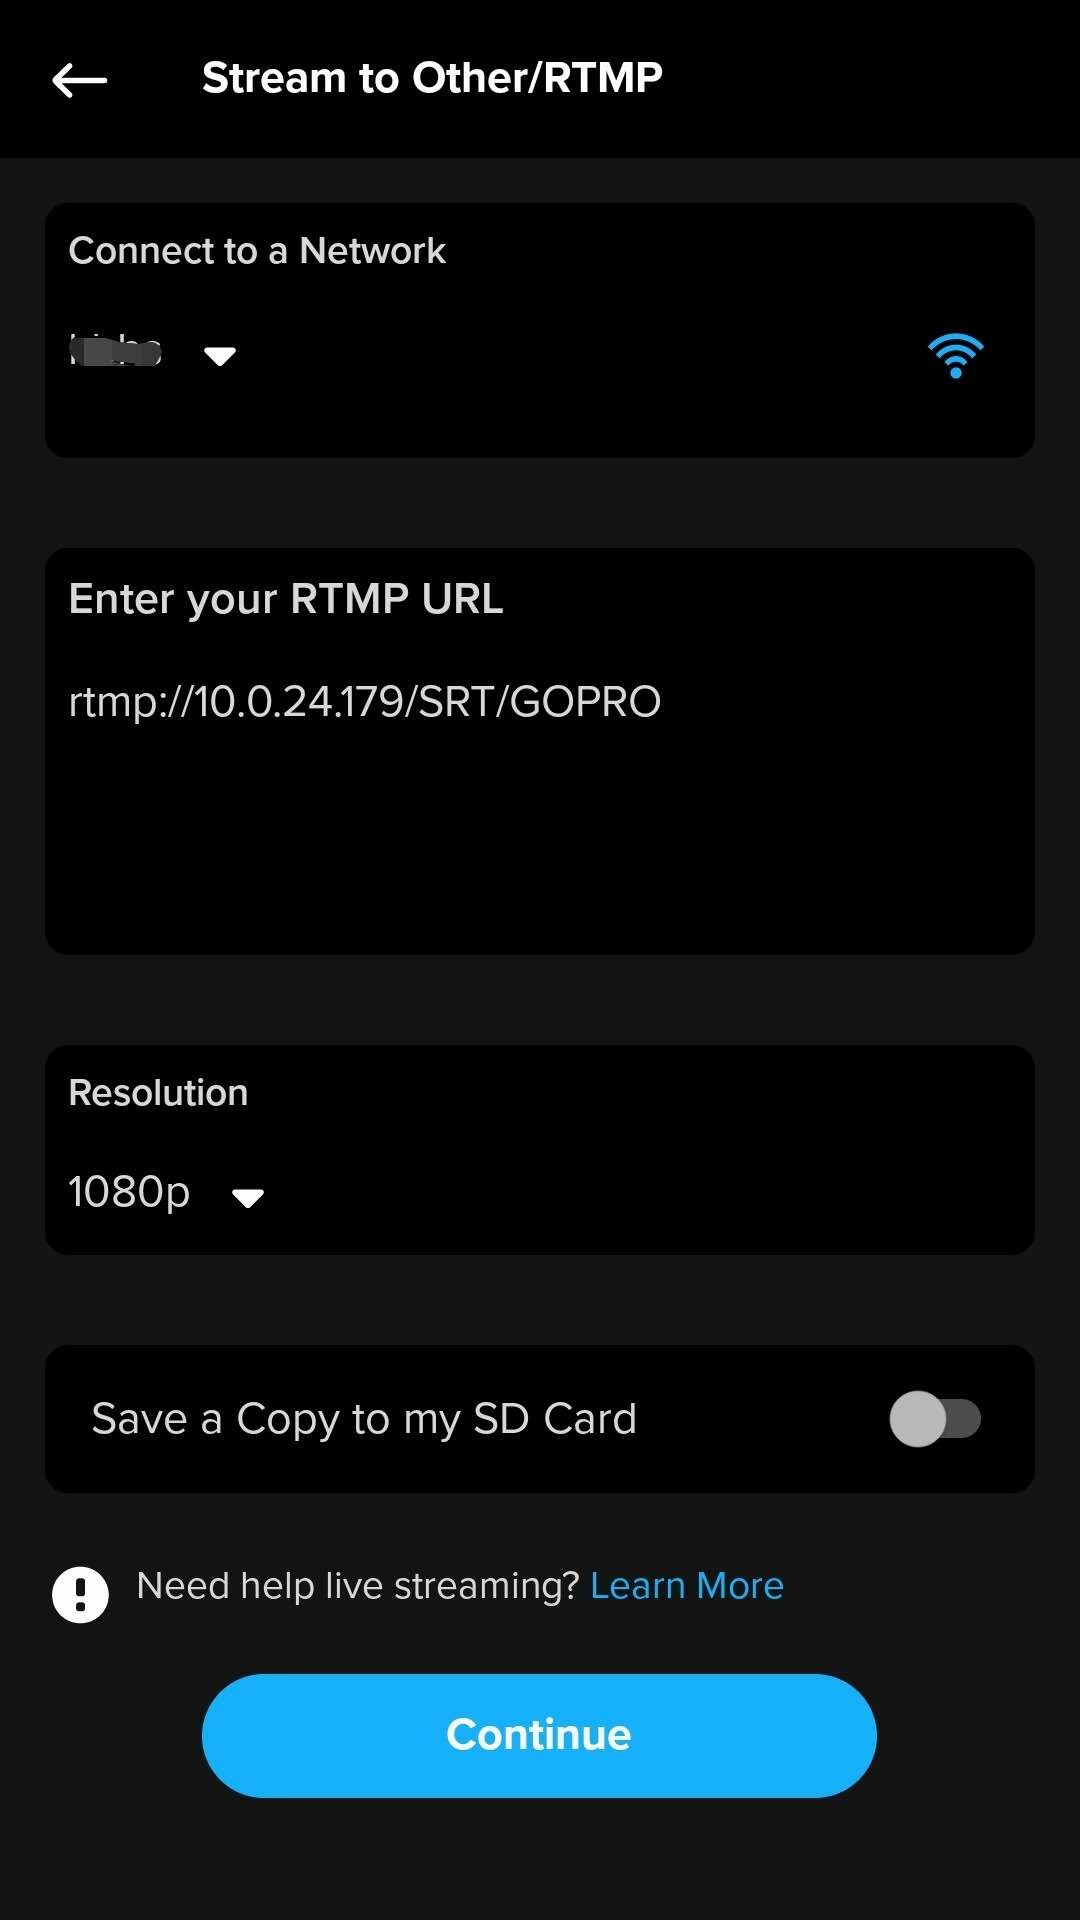
- Go to GoPro and wait for your GoPro to be detected. Then tap the block Live Stream.
- Tap Other/RTMP.
- Connect to your mobile hotspot/4G/5G router. “Connect to a Network“
- Enter your RTMP URL:
rtmp://192.168.0.10/SRT/GOPRO(mine was: “rtmp://10.0.24.179/SRT/GOPRO” during this tutorial)
Exchange the IP address for the one you have on your RPI – I would recommend setting a static IP in your DHCP server on the 4G/5G router for your Raspberry PI. - Select wanted resolution, I’m using 720p or 1080p.
- Tap Continue.
- Tap Go Live and you should get a live feed into your OBS.
Wait! There is another way to connect your GoPro every time you want to go live… – GoPro Labs
It actually might make it easier for you in the long run. Yes it will!
It require you to upload a new software to your GoPro – Yes the software is released by GoPro Labs.
You can select and download the software for your GoPro camera here
- Download and unzip.
- Copy the entire UPDATE folder to your camera’s memory card.
- Put the memory card in the camera and turn it on, the update will start automatically and it will also delete the UPDATE folder after the update finishes.
- Now you can use QR codes for easy WiFi connections, setting stream resolution and go live. Save the QR codes you need on your phone or print it out…
- Go here to generate your QR codes. PS! Remember to untick the “Store a high quality copy on camera”
- Your WiFi and RTMP address will be pre stored in the camera, you will only need to scan the Launch Your Live-Stream QR code when you want to go live.
Easy Peasy!
OH! Hang on! Make it free…???
If you feel that $70 a month is a bit steep for WMSPanel, as I do. You can use this setup without the panel.
When you have tested that your camera setup works, you can delete your server from the WMSPanel, BUT!
Make sure you have tested all camera feeds first!
For this part I recommend using the free WinSCP SFTP client to do file transfers from and to your RPI.
- In WinSCP or Filezilla, connect to your RPI using
rootcredentials. - Navigate to
/etc/nimble - Mark and download the two files:
nimble.confandrules.conf - Make a security copy of both files FIRST! I saved a copy in the cloud…
- Open rules.conf in Notepad++ or Notepad.
- Mark and cut everything (Ctrl+X) and paste it onto this website: Unminify
- Press Unminify and Copy
- In Notepad++, paste (Ctrl+V) the code from Unminify, it will now be clean and readable.
- Save the changes to
rules.conf - In WinSCP you upload the rules.conf and overwrite the existing one.
- In Putty, log in as regular user (pi, if you did not change it), and issue this command:
sudo service nimble restart - Do a test stream from your camera(s)to your OBS to check that it works. It should.
- If everything works, delete your server from WMSPanel if you want to use Nimble Streamer for free.
- When you need to do any changes to your config, you need to do that in
rules.conffrom now on. - Remember, you can also change the
rules.confby typing this in Putty:sudo nano /etc/nimble/rules.confjust remember to save and restart Nimble Streamer after each change. - pid, hash, id, rid’s in the
rules.confmust NOT be changed or added without setting it all up in WMSPanel first… So do it right the first time!
The rules!
The rules can be fairly easy read after running the file content trough Unminify.
Warning! Never change any “hash” – This will break the setup and you will have to use your backup file…
A few things you might have to change sometime…
“RtmpSettings”:
- login
- password
You would probably not have to set this, as it’s the stream from your GoPro. Yes, people can pick it up if they get onto your wifi… So not likely.
“UDPSenderSettings“:
- Do NOT change “hash” “id” or “rid”!!
- “ip”: is the IP or URL you send your videofeed to. You might need to change this sometime..
It’s good practise to setup a subdomain that has an “A” record that points to the static IP of where your OBS is listening for your feed (at home?) - “port”: is the port you are sending the video feed to. This is UDP trafick.
- “parameters”
“name”: “maxbw”, “value”: “500000” is the max allowed bandwith in bytes per second (NOT bits per second). This example should be fine up to 1080p resolution @ 50Hz.
Setting this value to high can lead to bad video feed if you experience bad coverage.
Set the value to double what you normaly average use for your SRT stream.At 1080p you are probably sending at 2Mbps, then you should set the value to 4Mbps (500000 bytes per second).
At 720p you probably sending at 1,2Mbps, then you should set the value to 2.4Mbps (300000 bytes per second).
Do not push this value to high.
- Drop down to “ServerSettings”: { “MaxCacheSize”: 512, “MaxFileCacheSize”: 4096, “LogMode”: “info”
– MaxCacheSize I set to 512, but 128-512 would probably work fine too.
– MaxFileCacheSize should be fine at 4096
That’s about it… – More around this setup
For the IRL setup we recommend to bundle your system with these components
- Raspberry Pi and preferrably a case for it.
- A USB powered 4G/5G router.
- A big PowerBank or two is recommended, with some decent USB power cables.
- Maybe a power USB hub is needed for the power distribution from the PowerBank.
- A decent wifi enabled camera like the GoPro 9 Black with a Media Mod on it.
- Selfie stick for the camera.
- A decent backpack/fannypack ;p that suits your needs.
- Velcro cable ties to keep your cables neat and tidy
Copyrights and Credits
- This “howto” is made for you all to help you get started with streaming IRL.
- It is not for you or others to repost in any form or way. Please respect this.
- You are free to post links to this tutorial, but leave us credits.
ShoutOut to
- TrasMaTech – Tommy (initial setup/idea)
twitch.tv/trasmatech – Live on Twitch - HotRod – Frode (writeup tweaks and tester)
twitch.tv/hotrodkcs – Live on Twitch - Softvelum – The makers of Nimble Streamer
softvelum.com/nimble